You probably know by now that I am enamored with modeling woodturning in 3D!
I decided to challenge myself and my turning skills by defining a tough project for a good cause …. my mother 🙂
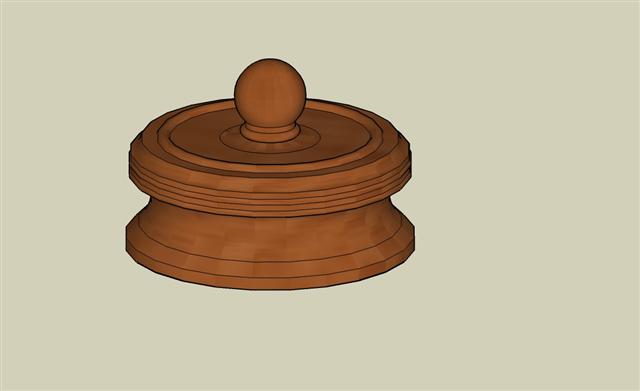
Design summary
This project required a great deal of design and planning. Not only did it need to look good but it also needed to be functional. The knob on the top is used to wind the music box and the lid rotates with the music. This feature meant that the music box needed to fit perfectly inside the box dead on center. The top had to be turned with the exact dimensions so that it would rotate without interference with the base and mate correctly with the music box drive shaft. The lid had to be removable, dictating the use of a coupler that needed to be the correct depth so as to engage, without binding, the music box key.
The model perfectly defined all the interior parts. All I had to do was turn them properly 🙂
Well the project is complete and as usual it was fun and educational.
A video can be enjoyed at the tunredoutright video channel
 |
I started this project in February. The previous post provides more details on my sources of inspiration etc.
“Woodturning with Sketchup” will provide details on the modeling aspects of this project. A book is available dedicated to using SketchUp for modeling. |
Below outlines the process and methods used to turn the music box:
 |
Wood selection: Three pieces of Redwood Burl were chosen all about 5x5x3. The model helped me select the correct sizes. Without a plan it is easy to get blanks that aren’t thick enough.
Two were for the base and top. The third was cut up for the finial and other parts. |
|
  |
A chuck mounted screw center was used to mount the blanks. Insure that the blank screws tight against the face of the chucks jaws. | |
  |
Throughout turning, the story stick (printed full scale from the model) was used to guide the turning. It was as easy as laying the caliper on the paper and adjusting to the print. Show here is a 2D (left) and a 3D type of story stick. | |
  |
A dove tail that matched my stronghold jaws was turned. Since Redwood is so soft, insure that the jaws fit perfectly, getting the most surface contact possible. The face of the jaws (not the back) need a solid and flat mating surface.
Turn the base round. |
|
 |
Shape the exterior and interior of the base using the story stick as a guide.
Sand to 400 grit, finishing the base. |
|
  |
Part the base off and make a jam chuck from the waste, that fits the perimeter of the bases lip.
Finish the bottom with the tail stock brought up for support. |
|
  |
Turn the top to round using the same work holding techniques show above.
Drill the center to 1/2″ and turn the underside of the lid to finished internal dimensions. Not shown: Size and part of off the lid. |
|
  |
I used a 1/2 bolt with the head cut off in a collet chuck for holding the lid.
Mount the lid with the top surface toward the tail stock. Turn and finish the lids outer features |
|
 |
The lid with the features turned and final sanding to 400 grit | |

|
Turn the finial from a block of burl to the story stick dimensions. | |
 |
The next section will be focussed on the surface treatment of the lid. The lid seemed plain to me, so I decided some carving was in order. I set out to chip carve the surface but Redwood burl doesn’t really chip carve that well. (I tried it on a piece of scrap). I decided to wood burn the detail instead.
In either case I needed a pattern. SketchUp proved its versatility and I used it to design a scale pattern. This was challenging because the pattern had to fit inside the inner ring and still provide a balanced appearance. It was quite easy to do! |
|
  |
The pattern was taped in place and traced after which the surface was “burned”… Sweet! | |
  |
A coupler was constructed of a ring that would mount on the finials shaft.
A slot was routed in the coupler to accept the key of the music box. (I suggest unlike this picture you put it in a vice for safer operation).The thickness of this coupler was adjusted to give perfect elevation of the top above the base while rotateing. This coupler will be glued on the finials shaft at assembly. |
|
  |
Now it gets complicated. The music box has to be precisely positioned and mounted in the center of the box.
To accomplish this a jig consisting of peice of 1/4″ fiber board was mounted on a waste block and turned to fit inside the base. Before removing it from the lathe a hole the size of the key was drilled on center. The music box was painted and glued (CA) in place using this jig. |
|
 |
The final assembly note the redwood veneer on the surface of the music box. The plastic was ugly. | |
 |
Don’t forget to sign it! |
More Modeling posts on the Music Box:
Enjoy…. Donnie
Don’t forget to visit the store where you will find some interesting books on wood turning!
Pingback: Holy Water Font | Turned.Out.Right Woodturning Web-shop