
We will bring in the New Year with a project I started nearly 3 months ago.
My plan was to make a lidded vessel and practice some surface treatments along with advancing my skill in the use of pre-catalyzed lacquer.
Design
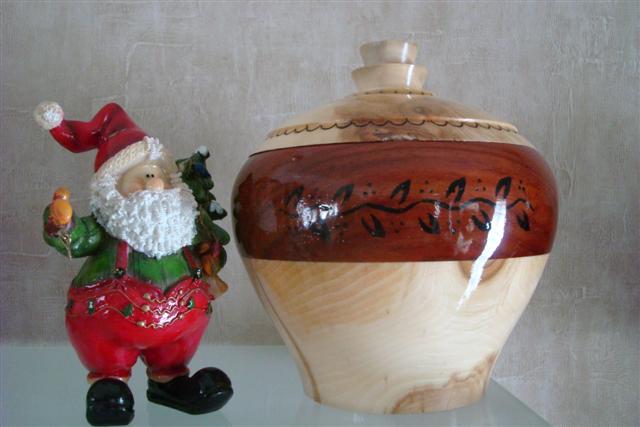
The design was to be made of segments of Padauk and aspen with a fitted lid and integrated finial. This was not a project that I computer modeled, just started mak’in shavins!
Turning

The vessel was turned and shaped from a dried Aspen blank. The top portion of the vessel was parted off and saved for the top. A Padauk blank was glued to the top of the vessel after which the vessel was turned to final shape.
The vessel was then hollowed to about 1/8 thick.
The Godfather: Part III movies
The lid was turned from the top portion of the aspen blank including a finial.
Vines

The inlay was done by using a template to outline the vine. Then a piercing tool was used to relieve the outline to about a 1/8 inch depth. The relief was filled with black CA and sanded while on the lathe. The process was repeated multiple times until all pits were filled. The body remained on the chuck while carved and until the lid was finished.
Lid

The inside of the lid was turned first with a lip that fit tight into the body of the vessel. After the underside of the lid was turned and sanded the top side was turned while friction fit into the body. The finial was turned into the top (not a separate piece).
The edge of the lids turned features were enhanced with wood burned crescents. I discovered a great way to get the pattern even around the circumference of a circle without calculation and a painstaking layout.
First mark the center of the circle to be outlined with crescents.
Then draw a line across the circle splitting it exactly in half. This line is the center reference line and we will burn left and right of this line from both sides of the circle as we progress around the circumference.
I’ll see if I can explain the technique:
Starting at the reference line burn one crescent on the right of the line, then on the left of the line. Rotate the circle (180 degrees) until the reference line on the other hemisphere of the circle is in front of you. Burn a crescent on the right and left of the reference line.
Repeat this process in groups of right-left pairs followed by rotating the circle.The pattern will evenly move around each hemisphere until it reaches the equator. This leaves the very last crescents to be burned on either side of the the equator. Its likely that there will be a space that is slightly larger or smaller than the integral a crescent. At this point I make right-left adjustments as I bur the last pair of crescents. This means that the last crescents may overlap or have a small gap larger than the others. If the space is less than two crescents but larger than one I center one last crescent across the equator. I find that the error using this technique is small and if it is done evenly across the gap on both hemispheres it is not noticeable.
Look at the ring of crescents around the base of the finial in the photo above. You can see that the last crescent was burned between the previous ones but without touching them like the rest. (its the crescent that is at about 180 degrees around the ring)
Finish

The piece was finished with five coats of pre-catalyzed (precat) lacquer (Sherman Williams). Each coat only took 5 min to dry before applying the next. I found precat easy to use as it is quick drying, fills quickly, sprays predictably and polishes to a hard and deep finish. The only downside is that it has a pot life of 6 months and costs $32 a gallon.
After a week of drying the entire piece was progressively polished with Tripoli, Plastic polish and Wax.
Happy New Year,
Donnie @ Turnedoutright
Want to learn how to:
- Use free Google software to make 3D models of woodturning
- Apply a CA finish to a pen
- Turn a bowl from common boards
- Turn a functional wine glass
- Make a metal spinning tool rest
- Make a pen bushing storage cabinet, from simple parts