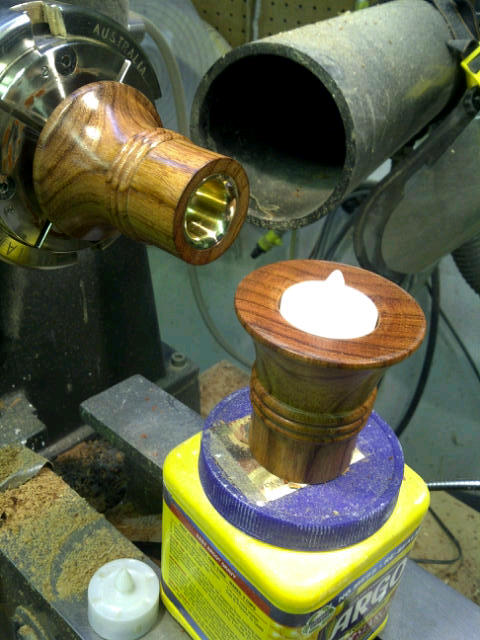
New Video Channel!

Posted on March 8, 2008

Turnedoutright is now setup on a YouTube channel.

Go to the TURNEDOUTRIGHT Video Channel to subscribe to videos from the shop.

Donny png

» Filed Under Site | Leave a Comment

From the scrap bin!

Posted on March 3, 2008

Russian olive

Russian olive

Sometimes you just have to relax and turn from the scrap bin.

I thought I would try a small end grain natural edge with no sanding and an oil finish.

I found a piece of Russian Olive in the drying barrel!


Donnie

Don’t forget to visit the store where you will find some interesting books on wood turning!

» Filed Under Hollow Forms | 2 Comments

The Beehive is done!

Posted on February 28, 2008

Beehive (yellowheart) & bee2

I finally completed the beehive project. If you recall I modeled this project in SketchUp using some real world pictures of hives, and then turned it from the story stick.

Why did this take so long? Well the first one that was made from Osage Orange …..CRACKED.

This is a common problem in Utah because it is so dry.

I didn’t check the moisture content and therefore didn’t store it properly after turning. My normal method is to store it for a few months in a paper sack….you’d think I would learn by now!

I re-turned the piece from some DRY YellowHeart .

The bee is also turned from Yellowheart. The wings are velum (my wifes idea) and the antenna is florist wire.

Now is on its way to my sister!

Beehive (yellowheart) Beehive (yellowheart) & beebee

» Filed Under Hollow Forms | Leave a Comment

Ask Me a Question

Posted on February 26, 2008

How cool is this!

You can click on this button and leave me a woodturning question.

I will answer it on this blog ……

» Filed Under Site | Leave a Comment

The Mothers Day Music Box

Posted on February 18, 2008

Music box

I decided to take on another modeling and turning challenge and I started on the “Mothers Day” Project.

This turning project will feature a multi-piece music box made from Redwood Burl.

Inspired by the book “Masterful Woodturning” (ISBN 0-8069-8709-X). I decided to combine woodturning and music boxes.

Design goals for the Music Box project:

  • Box with a removable lid
  • Made from a burl
  • Music box hidden inside
  • Animation
  • Wind the music box without opening top
  • Pleasing shape

This is a unique challenge because I wanted to make the top rotate with the power of the music box as well as using it to wind the mechanism.

This meant that the box would be multiple pieces that would need to fit together with relatively tight tolerances.
Click to see model


To buy the book on modeling go to page two of the store !

» Filed Under Hollow Forms | 2 Comments

New “Woodturning with Sketchup” Blog

Posted on February 18, 2008

Join the growing group of users that have bought “Woodturning with SketchUp” and are discovering the benefits of using Google’s free sketching software to model their woodturning projects.

Just like the “Beehive Model” you will find that modeling your ideas on a computer can save time, wood and result in a better design.

The finished beehive illustrates how a difficult design challenge can be modeled and then turned with realistic proportions.

To minimize confusion I will highlight the woodturning for projects on this blog and the modeling on “Computer Modeling of Woodturning”.

Watch for the “Mothers Day Project”………….


Want to get started modeling, check out these resources:


Not all turners are interested in computer modeling, therefore I have created a separate Turnedoutright blog on the subject so a not to annoy users of this blog that are uninterested in modeling.


If you are interested in keeping current with computer modeling techniques go to “Computer Modeling of Woodturning” and subscribe to its feed.Donny png

» Filed Under Models | 1 Comment

Two new tools.

Posted on February 6, 2008

I discovered two new tools. One is purchased and one is shop-made.

Bedan Gauge: When I was turning a flute I needed to turn a cylinder very straight along a 24″ tube.I remembered seeing a jig attached to a Bedan that did this and decided to build my own. I won’t belabor this post with intimate details I think the pictures are self explanatory. The materials all came from HD’s metal bin. BTW the Bedan was also shop-made. Making this tool will require a small welder. Bedan gaugeBedan gauge installed
Shinto Rasp:While watching a Utube video on turning finials the craftsman used a Shinto Rasp to rough shape the piece. I had to have one and have so far found it to be an invaluable tool. The cutting surface is made from a matrix of what look like hack saw blades. The blade has two sides, smooth and course and can be easily flipped for use.This tool will seriously remove some material and surprisingly leave the surface smoother than you would imagine. Shinto rasp

Donnie Don’t forget to visit the store where you will find some interesting books on wood turning!

» Filed Under Tools | Leave a Comment

Vacuum Adapter

Posted on January 30, 2008

Some lathes (like the Stubby) have cross drilled main shafts and this makes the use of vacuum adapters a challenge. I decided to make an adapter for my stubby this weekend. The adapter detailed below can be made from standard hardware store items, except for the double sealed bearing which you can get from Master Carr in a few days.


I modified a design from the Fall Issue of Wood turning Design. The main design modifications consisted of the addition of a vacuum shaft and MT2 seal.The modified design assembly is shown to the right with individual parts detailed below. Vacuum assembly
Rotating adapter:made from standard 1/4 MIP inch threaded pipe, air fittings and a double sealed bearing. The right angle adapter is fitted with a nipple that is CA’d into the bearing and the other end is fitted with a standard air fitting. The fittings are Watts brass pipe fittings from Home Depots plumbing section and the bearing is 6384K49 from Master Carr.The 1/4 MIP x Close nipple [A-740, Watts] was mounted in a 3 jaw chuck and the threads turned to the ID of the bearing.One end of the nipple was then threaded into a FIP elbow [Watts A-727] and the other was then glued with CA into the bearing.The bearing assembly is pressed into the mortise in the outer hand wheel adapter after inserting the bearing seal. The bearing is secured with 3 screws that capture the outer ridge of the bearing and press it against the seal. The bearing could be epoxied into the mortise eliminating the seal and screws but I wanted to make the bearing replaceable. rotating adapter
Bearing seal: made from non-slip shelf material. I got mine from Albertsons grocery store. It is a soft neoprene like material used to line shelves. You can also use neoprene PN9109K62 from Master Carr for any of these seals.  
Hand wheel adapter (outer): made from MDF turned on waste block and a mortise that fit the bearing was turned on center with a 3/8 center drilled hole. The diameter of the hand wheel adapter should match your lathes hand wheel. Outer adapter
Hand wheel seal (inner): made from non-slip shelf material. You could eliminate this seal and just glue the two sections of MDF together. I wanted to be able to get to the Tnut (PN90975A059 from Master Carr) inside the assy if necessary.  
Hand wheel adapter (inner): made from MDF turned on a waste block and bored with a 3/8 inch hole and a 1”x1/8 deep countersink on its inside surface. A Tnut is installed on center on the inner surface. This nut will receive the vacuum shaft when it is inserted through the headstock. I installed the Tnut on the lathe using a 3/8 all thread to get it centered in the 3/8 hole. I re-tapped the thread in the Tnut to match the 1/8 IP pipe thread (which amazingly was in my tap set).

Note: the Tnut must be countersunk below the surface so that the two halves of the hand wheel adapter can be fit together without interference.

adapter inner
Hand wheel seal outer (outer): made from non-slip shelf material. The seal is glued to the outer surface with contact cement. This seal will be pulled tight against the hand wheel when in operation. Seal outer
Vacuum shaft: to deliver the vacuum to the vacuum chuck this is a 1/8 IP “all thread lamp pipe” from HD PN70270 [Westinghouse] which is close to 3/8 inches in diameter. I installed a 3/8 diameter clear hose on the shaft to help prevent scratching the MT2 tapir when the vacuum shaft is installed in the headstock. I used a 30 inch all thread pipe and cut it to the size of my headstock. Vacuum Assy
MT2 Seal: the seal in the head stock taper is made from a #2 neoprene plug from Lowe’s [Hillman 13/16 x 5/8 x1] . Freeze the plug (that will make it hard for drilling) and then drill it with a Jacob chuck while it is jammed in the headstock. The MT2 seal is inserted on the shaft and secured with 1/8 IP lamp rod bolts and washers [Westinghouse, Home Depot PN70172].. Vacuum shaft

In operation the vacuum shaft with the MT2 seal installed is pressed into the MT2 taper. While holding the shaft the hand wheel adapter is screwed onto the other end of the shaft until it is tight on the lathes hand wheel. Attach the vacuum hose to the rotating adapter and screw on the hand wheel adapter. Plug the vacuum shaft and check for leaks. Don’t be surprised if it really sucks :)


Don’t forget to visit the store where you will find some interesting books on wood turning!
Donny png

» Filed Under Stubby, Tools | 1 Comment

Polymer Clay Segment & Inlay

Posted on January 22, 2008

Madrone open form Madrone open form 2

Over the holidays I experimented with a new turning material “Polymer Clay”. I was familiar with this materials use in crafts and I also saw a few pens made from it. Since that time I have been wanting to experiment with it for use as a substitute for finials, inlays and borders in turned pieces.

Polymer clay is a clay that at room temperature is soft and pliable. It is hardened by cooking it at 275 degrees for 30 minutes per 1/4 inch (Premo brand). When it is hardened correctly (which I have found to be a bit unpredictable) it turns easily, somewhat like acrylic. Many different effects are possible. In this case I used extruded polymer clay hearts, embedded in a black base clay as the decorative segment in the Madrone hollow form.

Donny


First knead black clay and then roll it to a consistent thickness between a couple of 1/4 thick slats. Playmer #1
Then a slice of 4″ black pipe was used as a cookie cutter to make a more or less round disk. Polymer cookie cutter
Use previously extruded and baked heart shaped strips. Cut them to lengths about equal to the radius. Hearts
Push the heart strips into the clay in a radial pattern. Insure there are no voids. Bake this disk at 275 degrees for 30min. Embeded hearts
Make a jam chuck with a tenon in the middle that matches the same size hole drilled in the disk. Polymer chuck
Mount the disk on the jam chuck with hot melt glue and turn the face flat. Face  one
Flip it over and turn the alternate surface flat. Face 2
Trim the edge with a skew. Polymer edge
The disk is now ready to laminate in the turning. Completed disk
I glued this disk between the sections of a turned Madrone form, then hollowed it. Madrone open form

Visit the store for books on wood turning techniques, software and plans. Donny png

» Filed Under Hollow Forms, Uncategorized | 4 Comments

The bowl goes to college

Posted on January 15, 2008

Fruit bowl at Regis

The bowl that I turned this weekend is already in use in my daughters dorm.

Donny png

» Filed Under Bowls | Leave a Comment

« go backkeep looking »